Kubernetes Pods Explained
2 August 2026 · 26 min read
What a Pod actually is, starting from the pause container nobody mentions: the lifecycle and its phases, imperative versus declarative creation, the manifest field by field, and the multi-container patterns worth knowing.
- Kubernetes
- Containers
- DevOps
- Infrastructure
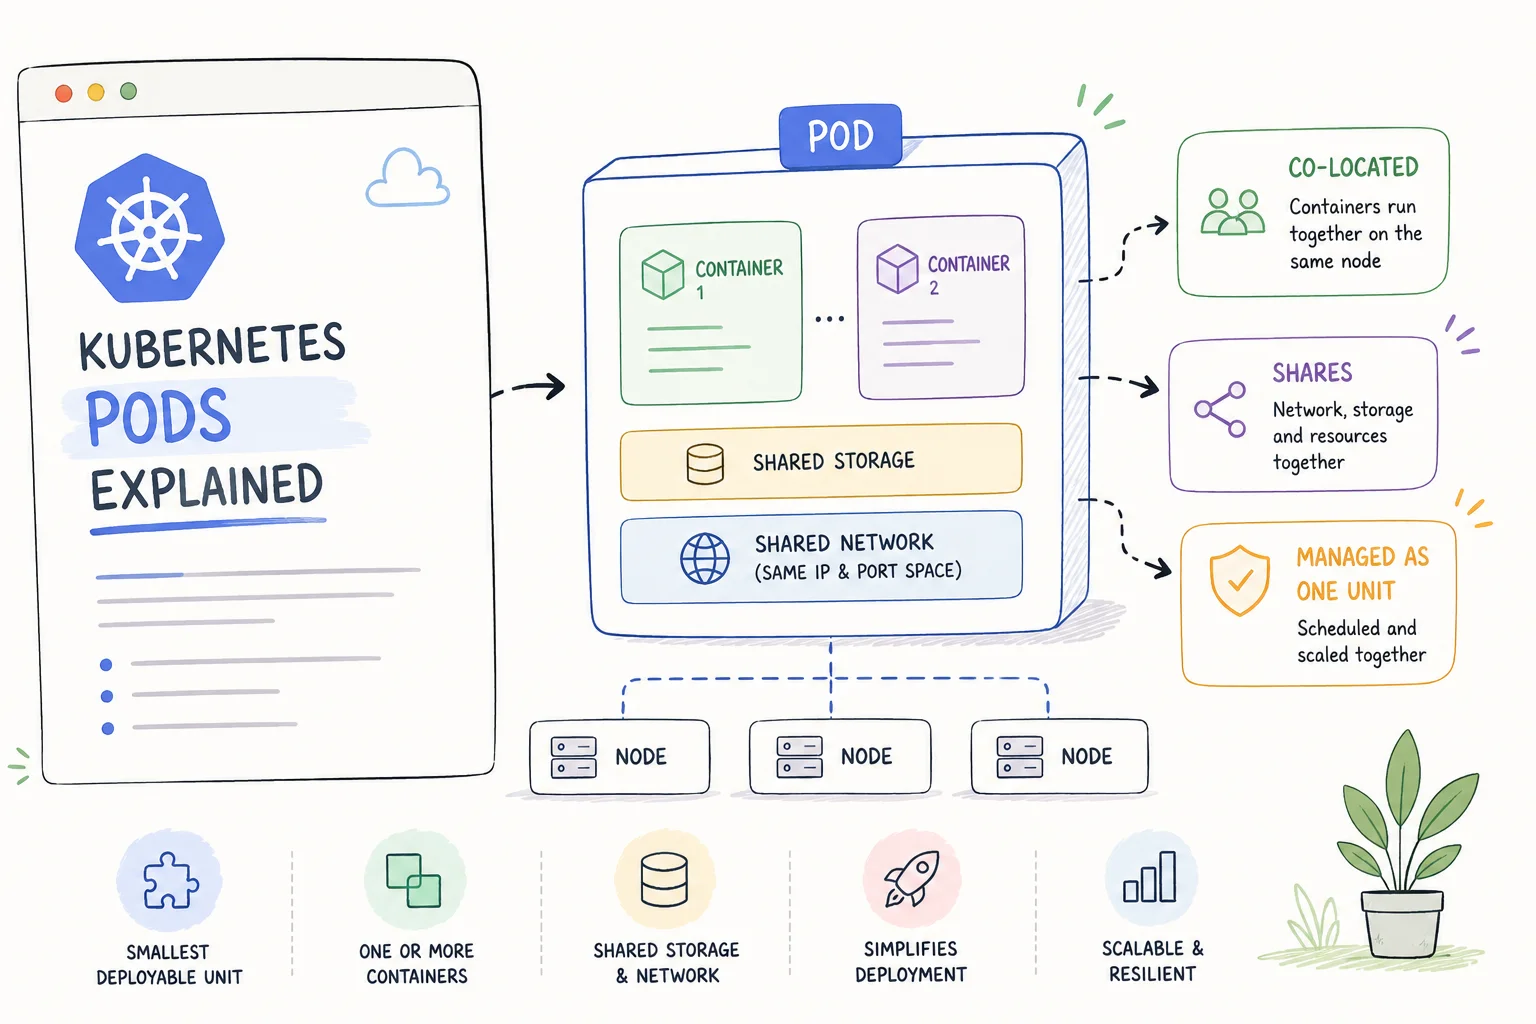
1. Understanding Pods as the Smallest Deployable Unit
What Exactly Is a Pod?
A Pod is Kubernetes' atomic unit of deployment. You cannot deploy anything smaller than a Pod. While you might think of containers as the fundamental building block (since that's what actually runs your code), Kubernetes wraps containers in Pods for important architectural reasons.
The Technical Reality:
When you create a Pod, Kubernetes actually creates something called a pause container (also called the infrastructure container) first. This hidden container:
Holds the network namespace for the Pod
Acquires the Pod's IP address
Stays running for the Pod's entire lifetime
Allows your application containers to restart without losing network identity
Your application containers then join this pause container's namespaces. This is why all containers in a Pod share the same IP address and network stack.
flowchart TB
    subgraph POD["POD"]
        NS["Shared Network Namespace<br/>(pause container)<br/>IP: 10.244.1.5"]
        NS --> A["Container A<br/>:8080"]
        NS --> B["Container B<br/>:9090"]
        NS --> C["Container C<br/>:3000"]
        A --- VOL["Shared Volumes"]
        B --- VOL
        C --- VOL
    end
What Does "Smallest Deployable Unit" Actually Mean?
It means:
Scheduling granularity — The Kubernetes scheduler places entire Pods on nodes, never individual containers. If you have 3 containers in a Pod, they all go to the same node together.
Scaling granularity — When you scale up, you add more Pods, not more containers within a Pod. If you need 5 replicas of your web server, you get 5 Pods, each with its own web server container.
Failure granularity — If a node fails, the entire Pod fails. Kubernetes doesn't try to relocate individual containers from a Pod to different nodes.
Why Not Deploy Containers Directly?
Consider what you'd need to manage if Kubernetes deployed raw containers:
Networking: How would containers find each other? How would they share localhost?
Storage: How would you share files between containers?
Lifecycle: What happens when one container depends on another?
Identity: How do you refer to a group of related containers as one thing?
The Pod abstraction solves all of these:
| Problem | Pod Solution |
|---|---|
| Containers need same IP | Pod provides shared network namespace |
| Containers need shared files | Pod provides shared volume mounts |
| Containers have dependencies | Init containers and lifecycle hooks |
| Need atomic deployment | Pod is scheduled/deployed as one unit |
| Need health tracking | Pod-level status and conditions |
The Pod-to-Container Relationship: Real-World Analogy
Imagine shipping containers (the metal boxes on cargo ships). A Pod is like a shipping container, and application containers are like the packages inside it.
The shipping container (Pod) provides the outer boundary and tracking number
The packages (containers) inside share the same journey
When the shipping container moves, everything inside moves together
The shipping manifest (Pod spec) lists all packages inside
Customs (Kubernetes) deals with shipping containers, not individual packages
When to Use Single-Container Pods:
Most Pods contain exactly one container. Use single-container Pods when:
The container is self-sufficient
It doesn't need to share files or network with a helper
Scaling means running more instances of the same thing
When to Use Multi-Container Pods:
Use multi-container Pods only when containers are tightly coupled:
They must run on the same machine
They must share files
They communicate over localhost
They scale together as a unit
2. Pod Lifecycle and Phases
The Complete Pod Lifecycle Journey
When you create a Pod, it goes through a predictable sequence of events. Understanding this deeply helps you debug problems.
---
title: Pod Lifecycle Phases
---
flowchart TD
    PC["Pod Created (via API call)"] --> PENDING

    subgraph PENDING["PENDING PHASE"]
        P1["1. Pod stored in etcd"]
        P2["2. Scheduler assigns Pod to Node"]
        P3["3. Kubelet receives Pod spec"]
        P4["4. Kubelet pulls container images"]
        P5["5. Init containers run (if any)"]
        P1 --> P2 --> P3 --> P4 --> P5
    end

    PENDING -->|"All init containers complete<br/>Main containers starting"| RUNNING

    subgraph RUNNING["RUNNING PHASE"]
        R1["At least one container running"]
        R2["Pod bound to node"]
        R3["Container States: Running, Waiting, or Terminated"]
    end

    RUNNING -->|"All containers exit<br/>with code 0"| SUCCEEDED
    RUNNING -->|"At least one container<br/>exits with non-zero"| FAILED

    subgraph SUCCEEDED["SUCCEEDED"]
        S1["All containers terminated"]
        S2["All exit code 0"]
        S3["Won't restart"]
        S4["Common for: Jobs"]
    end

    subgraph FAILED["FAILED"]
        F1["All containers terminated"]
        F2["At least one exit code != 0"]
        F3["Won't restart (unless policy)"]
    end
Deep Dive into Each Phase
PENDING Phase
A Pod enters Pending immediately after creation and stays there until containers start running. Many things happen in this phase:
Step 1: API Server Processing
flowchart TD
    CMD["kubectl apply -f pod.yaml"] --> API

    subgraph API["API Server"]
        A1["Authenticates"]
        A2["Authorizes"]
        A3["Validates"]
        A4["Stores in etcd"]
        A1 --> A2 --> A3 --> A4
    end

    API --> RESULT["Pod exists in cluster<br/>(but not scheduled yet)"]
Step 2: Scheduling
flowchart TD
    subgraph SCHED["Scheduler"]
        direction TB
        E["Evaluates:"]
        E1["Resource requests"]
        E2["Node selectors"]
        E3["Affinity rules"]
        E4["Taints/tolerations"]
        E5["Available nodes"]
        E --> E1 --> E2 --> E3 --> E4 --> E5
    end

    SCHED --> RESULT["Pod assigned to Node<br/>(nodeName field set)"]
What Can Cause Prolonged Pending:
| Symptom | Cause | How to Debug |
|---|---|---|
| No node assigned | No node has enough resources | kubectl describe pod shows "Insufficient cpu/memory" |
| No node assigned | No node matches node selector | Check node labels vs pod's nodeSelector |
| No node assigned | Taints blocking all nodes | Check tolerations |
| Image pull stuck | Wrong image name or tag | kubectl describe pod shows ImagePullBackOff |
| Image pull stuck | Private registry, no credentials | Check imagePullSecrets |
| Init container running | Init containers taking time | Normal if init does real work |
Example Pending Debugging:
$ kubectl get pods
NAME      READY   STATUS    RESTARTS   AGE
my-pod    0/1     Pending   0          5m

$ kubectl describe pod my-pod
...
Events:
  Type     Reason            Age   From               Message
  ----     ------            ----  ----               -------
  Warning  FailedScheduling  5m    default-scheduler  0/3 nodes are available:
                                                       3 Insufficient memory.
This tells you: No node has enough memory for this Pod's requests.
RUNNING Phase
Once at least one main container is running, the Pod transitions to Running. But "Running" doesn't mean "working correctly" — your app could be crashing in a loop.
Container States Within Running Pod:
# kubectl get pod my-pod -o yaml (simplified)
status:
  phase: Running
  containerStatuses:
  - name: nginx
    state:
      running:
        startedAt: "2024-01-15T10:00:00Z"
    ready: true
    restartCount: 0
  - name: sidecar
    state:
      waiting:
        reason: CrashLoopBackOff
        message: "back-off 5m0s restarting failed container"
    ready: false
    restartCount: 5
This Pod is "Running" but has a problem — the sidecar container keeps crashing.
Container State Details:
| State | Fields | Meaning |
|---|---|---|
waiting |
reason, message | Container not running yet. Reasons: ContainerCreating, ImagePullBackOff, CrashLoopBackOff |
running |
startedAt | Container executing. Has timestamp of start |
terminated |
exitCode, reason, startedAt, finishedAt | Container finished. exitCode 0 = success, else failure |
SUCCEEDED Phase
Pods reach Succeeded when:
All containers have terminated
All containers exited with code 0
The Pod won't be restarted
This is normal for Jobs — workloads designed to run to completion:
$ kubectl get pods
NAME              READY   STATUS      RESTARTS   AGE
backup-job-xyz    0/1     Completed   0          1h
FAILED Phase
Pods reach Failed when:
All containers have terminated
At least one container exited with non-zero code
restartPolicy prevents restart (Never or OnFailure with Succeeded)
$ kubectl get pods
NAME            READY   STATUS   RESTARTS   AGE
broken-job-abc  0/1     Error    0          5m

$ kubectl logs broken-job-abc
Error: database connection failed
Restart Policies
The restartPolicy field determines what happens when containers exit:
spec:
  restartPolicy: Always  # Options: Always, OnFailure, Never
| Policy | Behavior | Use Case |
|---|---|---|
Always |
Always restart containers, regardless of exit code | Long-running services (web servers, daemons) |
OnFailure |
Restart only if exit code is non-zero | Jobs that should retry on failure |
Never |
Never restart containers | Jobs where failure should not retry |
How Restart Backoff Works:
When a container keeps failing, Kubernetes doesn't just hammer restarts. It uses exponential backoff:
flowchart LR
    F1["First failure:<br/>restart immediately"] --> F2["Second failure:<br/>wait 10s, then restart"]
    F2 --> F3["Third failure:<br/>wait 20s, then restart"]
    F3 --> F4["Fourth failure:<br/>wait 40s, then restart"]
    F4 --> F5["Fifth failure:<br/>wait 80s, then restart"]
    F5 --> F6["...continues...<br/>up to 5 minutes max"]
This is why you see "CrashLoopBackOff" — Kubernetes is backing off between restart attempts.
Pod Conditions
Beyond the simple phase, Pods have detailed conditions:
$ kubectl describe pod my-pod
Conditions:
  Type              Status
  Initialized       True    # All init containers completed
  Ready             True    # Pod is ready to serve traffic
  ContainersReady   True    # All containers are ready
  PodScheduled      True    # Pod has been scheduled to a node
| Condition | True Means |
|---|---|
PodScheduled |
Pod assigned to a node |
Initialized |
All init containers completed successfully |
ContainersReady |
All containers have passed readiness probes |
Ready |
Pod can receive traffic (used by Services) |
3. Creating Pods: Imperative vs Declarative
These represent two fundamentally different approaches to managing infrastructure.
Imperative Approach: Telling Kubernetes What To Do
With imperative commands, you issue direct orders to Kubernetes: "Run this container," "Delete this Pod," "Scale this deployment."
The Imperative Mindset:
You are the operator
You execute commands in sequence
The cluster state is the result of your actions
No record exists of how you got to current state
Basic Pod Creation:
kubectl run nginx-pod --image=nginx
This single command:
Creates a Pod resource
Names it "nginx-pod"
Uses the nginx image
Applies default settings for everything else
Adding More Options:
kubectl run nginx-pod \
  --image=nginx:1.19 \
  --port=80 \
  --labels="app=web,env=prod" \
  --env="ENV=production" \
  --restart=Never
Common Imperative Commands:
| Command | Purpose |
|---|---|
kubectl run NAME --image=IMAGE |
Create a Pod |
kubectl create deployment NAME --image=IMAGE |
Create a Deployment |
kubectl expose pod NAME --port=80 |
Create a Service |
kubectl delete pod NAME |
Delete a Pod |
kubectl edit pod NAME |
Edit live resource |
kubectl scale deployment NAME --replicas=3 |
Scale deployment |
Imperative Object Configuration:
There's a middle ground — using imperative verbs with files:
kubectl create -f pod.yaml    # Create (fails if exists)
kubectl delete -f pod.yaml    # Delete
kubectl replace -f pod.yaml   # Replace (must exist)
This is still imperative because you're telling Kubernetes what to do, but you're using files to define the objects.
Declarative Approach: Telling Kubernetes What You Want
With declarative configuration, you describe the desired state, and Kubernetes figures out how to achieve it.
The Declarative Mindset:
You define the target state
Kubernetes continuously works toward that state
The definition IS the documentation
Changes are tracked through version control
The Core Command:
kubectl apply -f pod.yaml
apply is intelligent:
If resource doesn't exist → create it
If resource exists → update it to match the file
If resource is unchanged → do nothing
Declarative Workflow:
flowchart TD
    V1["pod.yaml (v1)<br/>Version controlled in Git"] --> APPLY1["kubectl apply -f pod.yaml"]
    APPLY1 --> K1["Kubernetes Cluster<br/>Creates Pod"]
    K1 -.->|"time passes...<br/>you need to make changes"| V2
    V2["pod.yaml (v2)<br/>Edit the file, commit to Git"] --> APPLY2["kubectl apply -f pod.yaml"]
    APPLY2 --> K2["Kubernetes Cluster<br/>Updates Pod to match new spec"]
Comparison Table
| Aspect | Imperative | Declarative |
|---|---|---|
| Command | kubectl run, create, delete |
kubectl apply |
| State tracking | None (you remember) | Git history |
| Repeatability | Run same commands | Apply same files |
| Collaboration | Share commands (error-prone) | Share files (reliable) |
| Audit trail | None | Git commits |
| Rollback | Remember previous commands | Revert Git commit |
| Partial updates | Tricky | Automatic |
| Learning curve | Lower | Higher |
| CKAD exams | Essential for speed | Required for complex tasks |
The Secret Weapon: Generating YAML from Imperative Commands
Here's the technique that makes you fast in CKAD:
kubectl run nginx --image=nginx --dry-run=client -o yaml > pod.yaml
Breaking this down:
| Flag | Meaning |
|---|---|
--dry-run=client |
Don't actually create anything; just simulate |
-o yaml |
Output the would-be resource as YAML |
> pod.yaml |
Redirect output to a file |
Generated output:
apiVersion: v1
kind: Pod
metadata:
  creationTimestamp: null
  labels:
    run: nginx
  name: nginx
spec:
  containers:
  - image: nginx
    name: nginx
    resources: {}
  dnsPolicy: ClusterFirst
  restartPolicy: Always
status: {}
Now you can edit this file to add anything you need (environment variables, volumes, etc.) and apply it.
More Examples:
# Generate Pod with port exposed
kubectl run nginx --image=nginx --port=80 --dry-run=client -o yaml

# Generate Pod with environment variable
kubectl run nginx --image=nginx --env="DB_HOST=mysql" --dry-run=client -o yaml

# Generate Pod that runs a command
kubectl run busybox --image=busybox --dry-run=client -o yaml \
  --command -- sleep 3600

# Generate Pod with resource limits
kubectl run nginx --image=nginx --dry-run=client -o yaml \
  --requests='cpu=100m,memory=128Mi' \
  --limits='cpu=200m,memory=256Mi'
4. YAML Manifest Structure
The Four Required Top-Level Fields
Every Kubernetes resource YAML follows this structure:
apiVersion: <api-version>   # 1. Which API version
kind: <resource-type>       # 2. What kind of resource
metadata:                   # 3. Resource identification
  # ...
spec:                       # 4. Desired state
  # ...
Let's examine each in detail.
Field 1: apiVersion
This tells Kubernetes which schema to use for parsing this resource. Different resources live in different API groups.
How to find the right apiVersion:
# List all API resources and their versions
kubectl api-resources

# Output (partial):
NAME          SHORTNAMES   APIVERSION   NAMESPACED   KIND
pods          po           v1           true         Pod
deployments   deploy       apps/v1      true         Deployment
services      svc          v1           true         Service
configmaps    cm           v1           true         ConfigMap
secrets                    v1           true         Secret
jobs                       batch/v1     true         Job
cronjobs      cj           batch/v1     true         CronJob
API Version Patterns:
| Pattern | Example | Meaning |
|---|---|---|
v1 |
v1 |
Core API group, stable |
GROUP/VERSION |
apps/v1 |
Named group, stable |
GROUP/v1beta1 |
networking.k8s.io/v1beta1 |
Beta, may change |
GROUP/v1alpha1 |
example.io/v1alpha1 |
Alpha, experimental |
Common apiVersions for CKAD:
| Resource | apiVersion |
|---|---|
| Pod, Service, ConfigMap, Secret, PersistentVolume, PersistentVolumeClaim | v1 |
| Deployment, ReplicaSet, DaemonSet, StatefulSet | apps/v1 |
| Job, CronJob | batch/v1 |
| Ingress | networking.k8s.io/v1 |
| NetworkPolicy | networking.k8s.io/v1 |
Field 2: kind
The type of resource you're creating. This must match one of Kubernetes' registered resource types.
kind: Pod
kind: Deployment
kind: Service
kind: ConfigMap
The kind determines what fields are valid in the spec section.
Field 3: metadata
This section provides the resource's identity and organizational information.
metadata:
  name: my-pod                    # Required: unique name within namespace
  namespace: default              # Optional: which namespace (default if omitted)
  labels:                         # Optional: key-value pairs for organization
    app: myapp
    environment: production
    version: v1.2.3
  annotations:                    # Optional: non-identifying metadata
    description: "Main application pod"
    owner: "platform-team@company.com"
    git-commit: "abc123def456"
Understanding Labels:
Labels are key-value pairs that identify resources. They're used for:
Selection — Find resources matching criteria
Grouping — Organize resources logically
Service routing — Services use label selectors to find Pods
# Find all pods with label app=myapp
kubectl get pods -l app=myapp

# Find pods matching multiple labels
kubectl get pods -l app=myapp,environment=production

# Find pods where version is NOT v1
kubectl get pods -l 'version!=v1'
Label Best Practices:
| Label Key | Purpose | Example |
|---|---|---|
app |
Application name | app: frontend |
environment |
Deployment environment | environment: production |
version |
Application version | version: v2.1.0 |
tier |
Architectural tier | tier: backend |
team |
Owning team | team: payments |
Understanding Annotations:
Annotations are for non-identifying information:
annotations:
  # Documentation
  description: "Handles user authentication"

  # Tooling
  prometheus.io/scrape: "true"
  prometheus.io/port: "9090"

  # Audit trail
  kubernetes.io/change-cause: "Update to fix CVE-2024-1234"

  # Build information
  build.company.com/git-sha: "abc123"
  build.company.com/pipeline: "main-123"
Labels vs Annotations:
| Aspect | Labels | Annotations |
|---|---|---|
| Used for selection | Yes | No |
| Character limits | Key: 63, Value: 63 | Key: 253, Value: 256KB |
| Purpose | Identify and group | Store metadata |
| Example use | app=nginx |
Long JSON config |
Field 4: spec
This is where you define what you actually want. The structure depends on the kind of resource.
Pod spec structure:
spec:
  # Container definitions (required)
  containers:
  - name: main
    image: nginx
    # ... container-specific settings

  # Init containers (optional)
  initContainers:
  - name: init
    image: busybox

  # Volume definitions (optional)
  volumes:
  - name: data
    emptyDir: {}

  # Pod-level settings
  restartPolicy: Always
  serviceAccountName: default
  nodeName: specific-node  # Manual scheduling
  nodeSelector:            # Node selection by labels
    disktype: ssd
Container Spec Deep Dive
The container definition is the heart of a Pod spec:
containers:
- name: nginx                        # Required: container name
  image: nginx:1.19                  # Required: image to run

  # Command and arguments
  command: ["/bin/sh"]               # Override ENTRYPOINT
  args: ["-c", "echo hello"]         # Override CMD

  # Environment variables
  env:
  - name: DB_HOST
    value: "mysql.default.svc"
  - name: DB_PASSWORD
    valueFrom:
      secretKeyRef:
        name: db-secret
        key: password

  # Port definitions
  ports:
  - name: http
    containerPort: 80
    protocol: TCP

  # Resource management
  resources:
    requests:                        # Minimum guaranteed
      memory: "128Mi"
      cpu: "100m"
    limits:                          # Maximum allowed
      memory: "256Mi"
      cpu: "200m"

  # Volume mounts
  volumeMounts:
  - name: data
    mountPath: /var/data
    readOnly: false

  # Health checks
  livenessProbe:
    httpGet:
      path: /health
      port: 80
    initialDelaySeconds: 10
    periodSeconds: 5

  readinessProbe:
    httpGet:
      path: /ready
      port: 80
    initialDelaySeconds: 5
    periodSeconds: 3

  # Security settings
  securityContext:
    runAsUser: 1000
    runAsNonRoot: true
    readOnlyRootFilesystem: true
5. Multi-Container Pods
When and Why to Use Multi-Container Pods
The general rule is: one container per Pod. But there are legitimate cases for multiple containers:
Use Multi-Container Pods When:
Containers are tightly coupled and must share resources
One container enhances/supports another
Containers must run on the same node
They need to communicate via localhost
They share the same lifecycle
Don't Use Multi-Container Pods When:
Containers scale independently
Containers have different lifecycle needs
They could run on different nodes
Communication can happen over the network
How Multi-Container Pods Work
All containers in a Pod share:
1. Network Namespace
flowchart TB
    subgraph POD["Pod: my-app  —  IP: 10.244.1.15"]
        A["Container A<br/>Listens on :8080"]
        B["Container B<br/>Listens on :9090"]
        A <-->|"A reaches B at localhost:9090<br/>B reaches A at localhost:8080"| B
    end
    EXT["External communication"] -->|"to either container<br/>uses 10.244.1.15"| POD
2. Shared Volumes
apiVersion: v1
kind: Pod
metadata:
  name: shared-volume-pod
spec:
  containers:
  - name: writer
    image: busybox
    command: ['sh', '-c', 'while true; do date >> /shared/log.txt; sleep 5; done']
    volumeMounts:
    - name: shared-data
      mountPath: /shared

  - name: reader
    image: busybox
    command: ['sh', '-c', 'tail -f /shared/log.txt']
    volumeMounts:
    - name: shared-data
      mountPath: /shared

  volumes:
  - name: shared-data
    emptyDir: {}
In this example:
writerappends timestamps to/shared/log.txtreadercontinuously reads from the same fileBoth see the same filesystem at
/shared
3. Same Node
The scheduler places the entire Pod on one node. You're guaranteed both containers run on the same machine.
Lifecycle Behavior
Startup Order:
All init containers run first (sequentially)
All main containers start simultaneously
There's no guaranteed order among main containers
If One Container Crashes:
The crashed container is restarted (based on restartPolicy)
Other containers keep running
The Pod status reflects the issue
If crashes continue, you see CrashLoopBackOff
Example: Handling Container Dependencies
If container B depends on container A being ready, use readiness probes:
containers:
- name: database
  image: postgres
  readinessProbe:
    tcpSocket:
      port: 5432
    initialDelaySeconds: 5
    periodSeconds: 5

- name: app
  image: myapp
  # App should handle DB not being ready initially
  # or use an init container to wait
Practical Multi-Container Example
Log shipping pattern:
apiVersion: v1
kind: Pod
metadata:
  name: app-with-logging
spec:
  containers:
  # Main application
  - name: app
    image: myapp:latest
    volumeMounts:
    - name: logs
      mountPath: /var/log/app

  # Sidecar that ships logs
  - name: log-shipper
    image: fluentd:latest
    volumeMounts:
    - name: logs
      mountPath: /var/log/app
      readOnly: true
    - name: fluentd-config
      mountPath: /fluentd/etc

  volumes:
  - name: logs
    emptyDir: {}
  - name: fluentd-config
    configMap:
      name: fluentd-config
6. Init Containers
What Are Init Containers?
Init containers are specialized containers that run before your main application containers start. They run to completion, one at a time, in order.
Key Characteristics:
Run sequentially, not in parallel
Each must complete successfully before the next starts
If any fails, the Pod restarts (based on restartPolicy)
Only after ALL init containers succeed do main containers start
Can have different images than main containers
Don't support readiness probes (they're not long-running)
Init Container Lifecycle
flowchart TD
    PC["Pod Created"] --> I1

    subgraph I1["Init Container 1 — Running"]
    end
    I1 -->|"Exit 0"| I2

    subgraph I2["Init Container 2 — Running"]
    end
    I2 -->|"Exit 0"| I3

    subgraph I3["Init Container 3 — Running"]
    end
    I3 -->|"Exit 0"| MAIN

    subgraph MAIN["Main Containers<br/>(all start simultaneously)"]
    end
Common Use Cases
1. Wait for a Dependency
initContainers:
- name: wait-for-database
  image: busybox
  command: ['sh', '-c',
    'until nc -z database-service 5432; do
       echo "Waiting for database...";
       sleep 2;
     done;
     echo "Database is ready"']
This ensures your app doesn't start until the database is reachable.
2. Clone Code or Configuration
initContainers:
- name: clone-repo
  image: alpine/git
  command:
  - git
  - clone
  - --depth=1
  - https://github.com/company/config.git
  - /config
  volumeMounts:
  - name: config
    mountPath: /config
containers:
- name: app
  image: myapp
  volumeMounts:
  - name: config
    mountPath: /app/config
volumes:
- name: config
  emptyDir: {}
3. Setup File Permissions
initContainers:
- name: fix-permissions
  image: busybox
  command: ['sh', '-c', 'chown -R 1000:1000 /data']
  volumeMounts:
  - name: data
    mountPath: /data
  securityContext:
    runAsUser: 0  # Run as root to change ownership
4. Generate Configuration
initContainers:
- name: generate-config
  image: busybox
  command: ['sh', '-c', 'echo "server_id=$(hostname)" > /config/server.conf']
  volumeMounts:
  - name: config
    mountPath: /config
5. Database Migrations
initContainers:
- name: db-migrate
  image: myapp:latest
  command: ['./migrate.sh']
  env:
  - name: DATABASE_URL
    valueFrom:
      secretKeyRef:
        name: db-credentials
        key: url
Complete Init Container Example
apiVersion: v1
kind: Pod
metadata:
  name: myapp-pod
spec:
  initContainers:
  # First: wait for database
  - name: wait-db
    image: busybox:1.35
    command: ['sh', '-c', 'until nc -z db-service 3306; do sleep 2; done']

  # Second: wait for cache
  - name: wait-cache
    image: busybox:1.35
    command: ['sh', '-c', 'until nc -z redis-service 6379; do sleep 2; done']

  # Third: download configuration
  - name: download-config
    image: curlimages/curl:latest
    command: ['sh', '-c', 'curl -o /config/app.json http://config-service/config']
    volumeMounts:
    - name: config
      mountPath: /config

  containers:
  - name: app
    image: myapp:v2
    ports:
    - containerPort: 8080
    volumeMounts:
    - name: config
      mountPath: /app/config
    env:
    - name: CONFIG_PATH
      value: "/app/config/app.json"

  volumes:
  - name: config
    emptyDir: {}
Debugging Init Containers
# See init container status
kubectl get pod myapp-pod

# Output might show:
# NAME        READY   STATUS     RESTARTS   AGE
# myapp-pod   0/1     Init:1/3   0          30s

# This means: 1 of 3 init containers completed

# Get logs from specific init container
kubectl logs myapp-pod -c wait-db

# If init container is currently running:
kubectl logs myapp-pod -c wait-cache

# Describe pod to see init container details
kubectl describe pod myapp-pod
Init Status Meanings:
| Status | Meaning |
|---|---|
Init:0/3 |
0 of 3 init containers completed |
Init:1/3 |
1 of 3 completed, second running |
Init:Error |
Current init container failed |
Init:CrashLoopBackOff |
Init container keeps crashing |
PodInitializing |
All init containers done, main starting |
7. Static Pods
What Are Static Pods?
Static Pods are managed directly by the kubelet on a specific node, without any involvement from the Kubernetes API server, scheduler, or controller manager.
The key difference:
Normal Pods: API server → Scheduler → Kubelet
Static Pods: Kubelet watches a directory → Creates Pod directly
How Static Pods Work
flowchart LR
    subgraph NORMAL["Normal Pod Flow"]
        direction LR
        N1["kubectl apply"] --> N2["API Server (etcd)"] --> N3["Scheduler"] --> N4["Kubelet"]
    end
flowchart TD
    subgraph NODE["Node"]
        MAN["/etc/kubernetes/manifests/<br/>├── etcd.yaml<br/>├── kube-apiserver.yaml<br/>└── kube-scheduler.yaml<br/><i>(You put files here)</i>"]
        MAN -->|"Kubelet watches<br/>this directory"| KUBELET["Kubelet<br/><br/>Automatically creates and<br/>manages Pods from manifests"]
    end
Why Do Static Pods Exist?
The Bootstrap Problem:
When a Kubernetes cluster starts, you face a chicken-and-egg problem:
The API server is a container that needs to be scheduled
But the scheduler is also a container that needs the API server
And etcd (the database) is also a container
Static Pods solve this. The control plane components run as static Pods managed by kubelet directly, without needing the full cluster to be running.
On a master node, you typically find:
/etc/kubernetes/manifests/
├── etcd.yaml
├── kube-apiserver.yaml
├── kube-controller-manager.yaml
└── kube-scheduler.yaml
Characteristics of Static Pods
| Aspect | Static Pod Behavior |
|---|---|
| Creation | Kubelet creates when manifest appears in watched directory |
| Deletion | Kubelet deletes when manifest is removed |
| Updates | Kubelet updates when manifest file changes |
| API visibility | A mirror Pod appears in API (read-only) |
| Scheduling | No scheduling—runs on the node where manifest exists |
| Pod naming | Node name is appended: my-pod-node01 |
| Control via kubectl | Cannot delete via API (recreates immediately) |
Finding the Static Pod Directory
# Check kubelet configuration
cat /var/lib/kubelet/config.yaml | grep staticPodPath

# Or
ps aux | grep kubelet | grep -- --pod-manifest-path

# Common locations:
# /etc/kubernetes/manifests/
# /etc/kubelet.d/
Creating a Static Pod
# 1. Create a manifest file
cat <<EOF > /etc/kubernetes/manifests/static-nginx.yaml
apiVersion: v1
kind: Pod
metadata:
  name: static-nginx
spec:
  containers:
  - name: nginx
    image: nginx
    ports:
    - containerPort: 80
EOF

# 2. Kubelet automatically creates it
# Wait a few seconds...

# 3. Verify
kubectl get pods
# Shows: static-nginx-<node-name>

# 4. Try to delete it
kubectl delete pod static-nginx-<node-name>
# Pod immediately recreates!

# 5. Actually delete it by removing the file
rm /etc/kubernetes/manifests/static-nginx.yaml
# Now it's gone
Mirror Pods
When kubelet creates a static Pod, it also creates a "mirror Pod" in the API server. This is read-only and lets you see the static Pod via kubectl get pods.
Mirror Pod characteristics:
Has annotation:
kubernetes.io/config.mirrorCannot be modified via API
Deleting it via kubectl does nothing (kubelet recreates)
Reflects the real Pod's status
# Identify a mirror pod
kubectl get pod static-nginx-node01 -o yaml | grep -A2 annotations
# annotations:
#   kubernetes.io/config.mirror: "..."
CKAD Relevance
For CKAD, you need to know:
What static Pods are
How to identify them
Where manifests are stored
That you can't manage them via kubectl
You probably won't create static Pods in the exam, but you might be asked to identify them or understand why a Pod keeps recreating after deletion.
8. Pod Design Patterns
These patterns describe standard ways to structure multi-container Pods. They come from distributed systems design and solve common problems.
Pattern 1: Sidecar
Purpose: Extend or enhance the main container's functionality without modifying it.
The Sidecar Analogy:
Think of a motorcycle with a sidecar. The motorcycle (main container) does the primary work—driving. The sidecar (sidecar container) adds capability—carrying a passenger or cargo. They move together, share the journey, but have different jobs.
flowchart LR
subgraph POD["POD"]
MAIN["Main Container<br/>- Business logic<br/>- Writes logs to<br/> /logs volume"]
SIDE["Sidecar Container<br/>- Log shipping<br/>- Watches /logs<br/>- Ships to ELK"]
MAIN -->|writes| VOL["Shared Volume<br/>(/logs)"]
VOL -->|reads| SIDE
end
Common Sidecar Use Cases:
| Use Case | Main Container | Sidecar |
|---|---|---|
| Logging | App writes logs | Fluentd ships logs |
| Monitoring | App runs | Prometheus exporter |
| Security | App serves traffic | mTLS proxy (Istio) |
| Sync | App uses config | Git-sync updates config |
| Compression | App serves files | Compressor processes uploads |
Complete Sidecar Example: Log Collection
apiVersion: v1
kind: Pod
metadata:
  name: app-with-log-sidecar
spec:
  containers:
  # Main application
  - name: app
    image: myapp:latest
    command: ['sh', '-c', 'while true; do echo "$(date) - App running" >> /var/log/app/app.log; sleep 5; done']
    volumeMounts:
    - name: log-volume
      mountPath: /var/log/app

  # Sidecar: ships logs to external system
  - name: log-shipper
    image: busybox
    command: ['sh', '-c', 'tail -f /var/log/app/app.log']  # Simplified; real would send to logging system
    volumeMounts:
    - name: log-volume
      mountPath: /var/log/app
      readOnly: true

  volumes:
  - name: log-volume
    emptyDir: {}
Real-World Sidecar: Service Mesh (Istio)
In Istio, every Pod gets an Envoy proxy sidecar automatically:
flowchart LR
    subgraph POD["POD"]
        APP["Your App<br/>Listens on<br/>localhost:8080<br/><br/>No security<br/>code needed!"]
        ENVOY["Envoy Sidecar<br/>- mTLS encryption<br/>- Traffic management<br/>- Observability<br/>- Circuit breaking"]
        APP <--> ENVOY
    end
    ENVOY -->|"All external traffic<br/>goes through Envoy"| EXT["External Traffic"]
Pattern 2: Ambassador
Purpose: Proxy outbound connections from the main container, simplifying how the app connects to external services.
The Ambassador Analogy:
An ambassador represents you in a foreign country. They handle the complexity of diplomacy, translation, and protocol. Your main container just talks to the ambassador (localhost), and the ambassador handles the complex external communication.
flowchart LR
    subgraph POD["POD"]
        MAIN["Main Container<br/>Connects to<br/>localhost:5432<br/><br/>Simple config:<br/>DB_HOST=localhost<br/>DB_PORT=5432"]
        AMB["Ambassador<br/>localhost:5432<br/><br/>Handles:<br/>- Service discovery<br/>- Load balancing<br/>- Failover<br/>- Connection pooling"]
        MAIN --> AMB
    end
    AMB --> DB["Database Cluster<br/>- Primary<br/>- Replica 1<br/>- Replica 2"]
Why Use Ambassador Pattern:
Without ambassador:
# App needs complex logic
db = connect_with_retry(
    hosts=['db-1.prod', 'db-2.prod', 'db-3.prod'],
    load_balance=True,
    ssl=True,
    ...
)
With ambassador:
# App has simple logic
db = connect('localhost:5432')  # Ambassador handles everything
Ambassador Example: Database Proxy
apiVersion: v1
kind: Pod
metadata:
  name: app-with-ambassador
spec:
  containers:
  # Main app - connects to localhost
  - name: app
    image: myapp:latest
    env:
    - name: DATABASE_HOST
      value: "localhost"
    - name: DATABASE_PORT
      value: "5432"

  # Ambassador - proxies to real database
  - name: db-ambassador
    image: haproxy:latest
    ports:
    - containerPort: 5432
    volumeMounts:
    - name: haproxy-config
      mountPath: /usr/local/etc/haproxy

  volumes:
  - name: haproxy-config
    configMap:
      name: db-proxy-config
Common Ambassador Use Cases:
| Scenario | Ambassador Does |
|---|---|
| Database cluster | Routes to correct shard, handles failover |
| Redis cluster | Manages cluster topology, routes by key |
| External APIs | Handles retries, rate limiting, auth |
| Legacy systems | Protocol translation |
Pattern 3: Adapter
Purpose: Transform the main container's output into a format that external systems expect.
The Adapter Analogy:
Think of a power adapter. Your laptop (main container) outputs one type of power/data. The adapter transforms it to what the wall socket (external system) expects. The main container doesn't need to know about the external system's requirements.
flowchart LR
subgraph POD["POD"]
MAIN["Main Container<br/>Outputs custom<br/>log format<br/><br/>2024-01-15 ERROR<br/>User login failed"]
ADAPT["Adapter<br/>Reads custom format<br/>Converts to JSON<br/><br/>{'time':'2024...',<br/> 'level':'ERROR',<br/> 'msg':'User...'}"]
MAIN -->|writes to| VOL["Shared Volume"]
VOL -->|reads from| ADAPT
end
ADAPT -->|JSON| LOG["Logging System<br/>(expects JSON)"]
Common Adapter Use Cases:
| Input (Main Container) | Output (Adapter) | Consumer |
|---|---|---|
| Custom log format | JSON logs | ELK Stack |
| Application metrics | Prometheus format | Prometheus |
| Custom health check | HTTP endpoint | Kubernetes probes |
| XML data | JSON data | Modern APIs |
Adapter Example: Prometheus Exporter
apiVersion: v1
kind: Pod
metadata:
  name: app-with-metrics-adapter
  annotations:
    prometheus.io/scrape: "true"
    prometheus.io/port: "9090"
spec:
  containers:
  # Main app - writes metrics in custom format
  - name: app
    image: legacy-app:latest
    volumeMounts:
    - name: metrics
      mountPath: /var/metrics

  # Adapter - converts to Prometheus format
  - name: metrics-adapter
    image: prom/statsd-exporter:latest
    ports:
    - containerPort: 9090
      name: metrics
    volumeMounts:
    - name: metrics
      mountPath: /var/metrics
      readOnly: true

  volumes:
  - name: metrics
    emptyDir: {}
Comparing the Patterns
| Pattern | Direction | Purpose | Example |
|---|---|---|---|
| Sidecar | Same direction as main | Enhance/extend main container | Log shipping, config reload |
| Ambassador | Outbound | Simplify external connections | DB proxy, API gateway |
| Adapter | Outbound | Transform output format | Metrics conversion |
Visual Comparison:
flowchart LR
    subgraph SC["SIDECAR (enhances)"]
        direction LR
        SM["Main"] --> SS["Sidecar (helps)"] --> SE1["External"]
        SM --> SE2["External"]
    end
flowchart LR
    subgraph AM["AMBASSADOR (proxies outbound)"]
        direction LR
        AMain["Main"] --> AAmb["Ambassador (proxies)"] --> AExt["External"]
    end
flowchart LR
    subgraph AD["ADAPTER (transforms output)"]
        direction LR
        DMain["Main"] --> DAdapt["Adapter (transforms)"] --> DExt["External"]
    end
Summary
| Topic | Key Takeaways |
|---|---|
| Pod basics | Smallest deployable unit; wraps containers; provides shared network/storage |
| Lifecycle | Pending → Running → Succeeded/Failed; containers have Waiting/Running/Terminated states |
| Restart policies | Always (services), OnFailure (jobs with retry), Never (one-shot jobs) |
| Imperative | kubectl run — fast, no audit trail, good for quick tasks |
| Declarative | YAML + kubectl apply — reproducible, version-controlled, production standard |
| YAML structure | apiVersion, kind, metadata, spec — every resource follows this |
| Multi-container | Shared network (localhost), shared volumes, same lifecycle |
| Init containers | Run before main containers, sequential, must succeed |
| Static Pods | Managed by kubelet directly, used for control plane, mirror pods in API |
| Sidecar | Helper that enhances main container (logs, mesh proxy) |
| Ambassador | Proxy for outbound connections (DB proxy) |
| Adapter | Transforms output format (metrics exporter) |